
Garage Ceiling Drywall Tape Coming Loose (2026 Guide)
Updated September 11, 2026
Loose ceiling tape needs an assessment of the joint and board beneath it. Access around garage door hardware and the condition of the overhead panels are part of the scope.
- Trusted since 2005
- Fully insured
- Dust-controlled sanding
- Paint-ready finishing
- 3-year workmanship warranty
Quick Answer
Loose ceiling tape needs an assessment of the joint and board beneath it. Access around garage door hardware and the condition of the overhead panels are part of the scope.
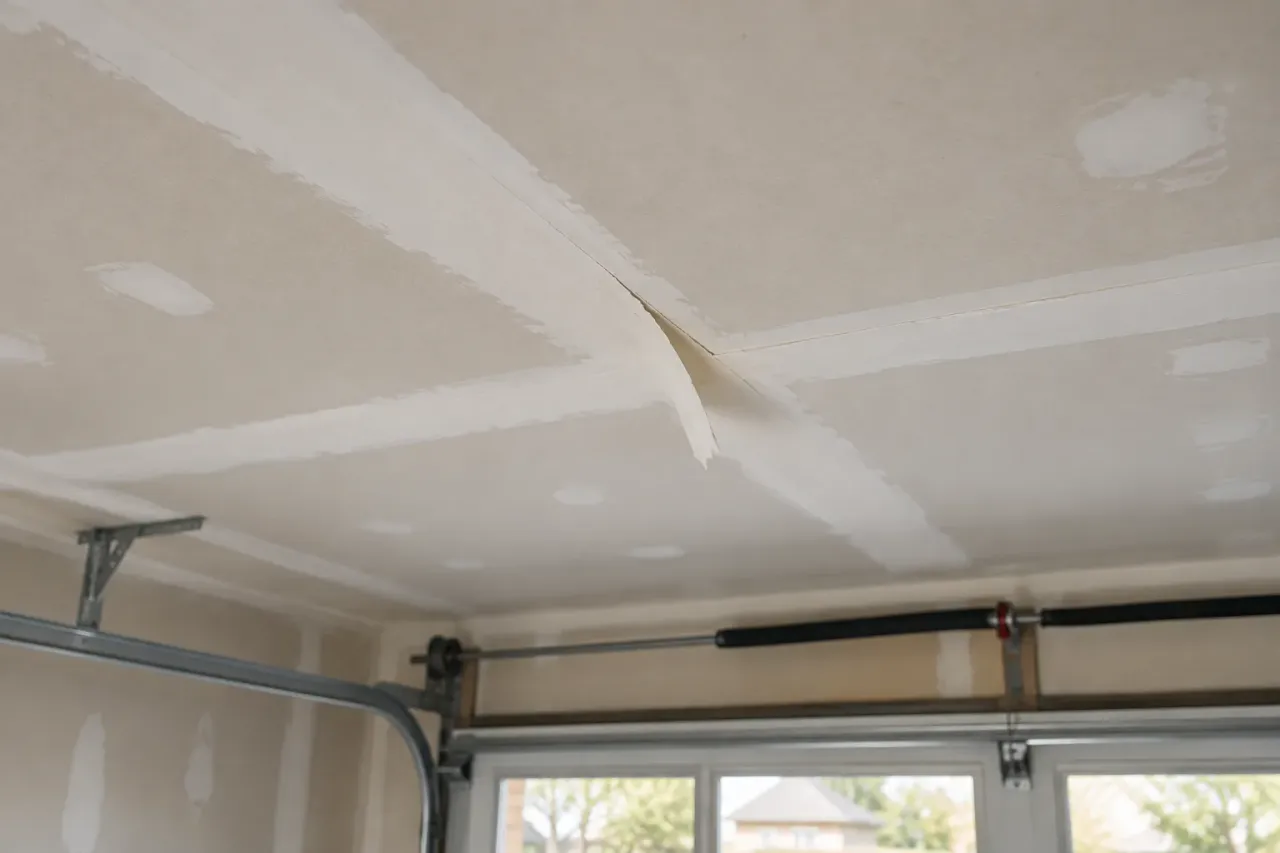
Garage ceiling drywall tape coming loose needs an assessment of the joint and the overhead board before a repair method is chosen. A short paper flap may be a localized tape problem, but sagging, wet or detached board changes the scope. Keep clear of suspect material and arrange the appropriate review instead of pulling the strip or covering it with paint.
EPF's garage ceiling and drywall repair service considers the failed area, access around door hardware and the intended finish. This guide explains what to photograph, how a ceiling repair can be organized and what should be included in the handoff. It is not a structural assessment or an instruction to disturb an uncertain overhead assembly.
Start with the condition you can see
Use these observations to prepare the assessment, not to diagnose concealed construction. Pair each detail photograph with a wider view so the repair area, adjoining surfaces and access are clear.
Tape flap, flat board
Assess the joint and extent of failed reinforcement.
Sagging or wet ceiling
Keep clear and arrange appropriate assessment.
Tracks or fixtures nearby
Plan access without altering hardware yourself.
Look at the board as well as the tape
A hanging strip draws attention, but the panel behind it is the starting point. From a safe position, note whether the ceiling appears flat, whether there are stains and whether other joints show separation. Record those observations without pressing or tugging on the board. A photograph cannot confirm the condition of concealed attachment or supporting construction.
If a panel is visibly loose or sagging, routine taping should not be the first assumption. Keep people and vehicles out from beneath the suspect area and seek suitable assessment. The correct response depends on the condition, not merely the length of the exposed paper. A cosmetic repair proposal should follow the findings about the base.
For a flat-looking ceiling with an isolated tape flap, the joint still needs review. The visible end may not show the full area of failed bond. Ask whether nearby tape is suitable to retain and what boundary allows the repair to be completed properly. Neither complete stripping nor the smallest possible cut is automatically correct.
Photograph the ceiling in a useful sequence
Take a broad view from the garage entrance that shows the ceiling planes and door tracks. Add views from the sides where they can be taken safely, then closer images of the affected seams. Label each area on a simple sketch so the estimator can connect a close-up with its actual position overhead.
Include approximate ceiling height and any boxed areas, drops or access openings. A rectangular floor measurement does not capture all the overhead details. If the loose tape runs into a wall corner, show the corner and adjoining wall too. Those transitions may belong in the finishing scope even when the main concern is the ceiling.
Do not stand beneath questionable material simply to get a sharper image. Tell the contractor if a detail cannot be photographed safely. Useful information includes access limitations as well as visible damage. The estimate can identify what needs inspection without requiring a homeowner to expose or test the assembly first.
Garage door hardware affects the work area
Tracks, springs, openers and brackets can restrict where a finisher can reach or position equipment. Show them in the initial photos. A ceiling seam directly above hardware may need coordination before the drywall repair can be completed, even if an identical seam in the centre of the garage would be straightforward.
Do not adjust springs, disconnect tracks or move electrical components to make the job accessible. The appropriate specialist should handle any necessary hardware or electrical work. The drywall quote needs to state those dependencies so access is ready at the correct stage and the repair is not improvised around a partially altered system.
Clarify the door position and use restrictions during work with the responsible trades. The garage should not remain an active vehicle route through an overhead repair zone. Planning temporary closure is part of completing the job, not an unexpected inconvenience to discover after protection has been installed.
What can cause tape to separate overhead?
Possible contributors include an unsuitable bond, previous repair preparation, damage, board condition or moisture. The location on a ceiling does not prove one cause. A garage's changing environment may also matter, but seasonal conditions should not become a substitute for assessing the affected joint.
Tell the estimator whether the tape was already loose when you moved in, whether it appeared after a repair or whether staining accompanied the change. Previous photographs and product information can be helpful. If the history is unknown, say so rather than inventing a timeline or material description from the appearance alone.
The peeling garage tape guide explains the difference between detached reinforcement, flaking coating and rough surface lines. That distinction is equally important overhead. A white strip can be part of several different material conditions, and the repair should follow what is actually present.
When the scope includes board repair or replacement
If the underlying panel is not suitable to retain, re-taping alone may be insufficient. Appropriate board corrections or replacement can become necessary before a new joint is finished. The replacement boundary should connect to suitable construction and allow the relevant assembly detail to be maintained.
A small visible stain or short loose seam does not establish the amount of board work. The affected area may be larger than the surface mark, or the board may prove suitable after assessment. The re-tape versus replacement guide helps compare those decisions without assuming every ceiling needs to be rebuilt.
Where supporting construction, ongoing movement or concealed moisture is uncertain, obtain the relevant professional review. EPF's finishing scope should not be treated as engineering certification. Ask what needs to be known before repair begins and how the proposed work will be updated once that information is available.
Attached-garage ceilings need project-specific details
An attached garage can include wall and ceiling assemblies with requirements beyond their visible finish. Significant replacement or alteration should preserve the applicable construction requirements. The correct detail depends on the existing project and cannot be reduced to one board thickness or finish level stated for every garage.
If you have drawings, renovation records or information about previous openings, make them available. Keep required access locations identifiable and tell the contractor about later trade work. A new repair should not accidentally conceal a service point because an opening looked unfinished in a photograph.
A cosmetic specification and an assembly specification answer different questions. Level 4 or Level 5 concerns surface finishing; it does not by itself establish fire, smoke or other construction performance. When that distinction affects the work, the appropriate professional or authority should confirm the repair requirements before the surface is closed.
How a suitable ceiling joint is rebuilt
Once the base and access are appropriate, failed material can be addressed within the assessed repair boundary. The joint is prepared for compatible reinforcement and finishing materials. The contractor should account for existing coatings, damaged edges and neighbouring tape rather than apply a standard patch over whatever remains.
Successive coats shape the repaired seam into the surrounding ceiling. A gradual blend may extend wider than the exposed tape, particularly where old finishing has left a raised profile. Ask how the finisher plans to meet the retained surface and whether nearby corners or fastener spots are included.
A good scope describes the finished condition, not just a coat count. More coats do not compensate for an unsuitable base, and fewer visible steps do not necessarily mean the work is complete. The materials and readiness of each stage guide the sequence before sanding and decoration.
Drying above a garage is part of the schedule
Tell the contractor whether the garage is conditioned and how frequently the door is opened. Conditions around an overhead repair can differ from those at a thermostat or in the adjacent house. Product instructions and the actual repair thickness should guide timing between stages.
Setting and drying describe different processes. A repair compound may harden while still retaining moisture, and a thick correction can take longer to become ready than a thin coat nearby. Avoid booking the painter solely from a setting-time label. Ask for an expected sequence with a confirmation point before decoration.
A schedule can identify active work visits, waiting intervals and the date normal access may resume. Those are not necessarily the same day. If another trade must return to reconnect or review hardware, include that coordination. Planning the dependencies helps avoid a finished-looking garage that is not yet ready for ordinary use.
Protect the whole area beneath the repair
Overhead work affects more than the narrow strip of ceiling being treated. Vehicles, stored belongings and work surfaces beneath it may need removal or protection. The contractor also needs clear space for safe access and material handling. Agree on that footprint before work starts.
EPF uses dust-control methods and HEPA-supported sanding where appropriate. Extraction at the tool can reduce dust, but containment and cleanup remain necessary. Do not assume a vehicle or open shelving is protected simply because the repair is small. Discuss what must leave the active area and what can remain covered.
The route between the garage and house deserves attention if household traffic normally passes through it. Plan temporary access changes and keep children or pets outside the work zone. A dry interval does not automatically mean every area is available; ask what can reopen without disturbing the repair or its protection.
Choose a ceiling finish that suits the room
A sound local repair can meet a utility appearance target without refinishing every ceiling plane. A homeowner preparing a bright garage workshop may want a more consistent surface. State that goal early so the quote distinguishes necessary joint repair from optional broader finishing.
Lighting and paint sheen influence how repaired transitions appear. Long side light can reveal a profile that is less apparent under even overhead illumination. Share the intended fixture layout and coating before the last finishing stage. A representative sample may help if the decorating expectation is demanding.
Level 5 is not an automatic requirement for a garage ceiling. It adds whole-surface skim treatment after appropriate joint work, but does not correct an unreliable panel or straighten poor supporting construction. The finish should be selected for the actual decoration and agreed appearance, with construction requirements considered separately.
Primer may reveal the final corrections
Inspect the sanded ceiling under the intended lighting before primer. Obvious ridges, exposed tape, damaged paper and unfinished transitions should be addressed. Appropriate dust removal is also part of preparation; primer is not a way to seal an unreviewed dusty surface and call the repair complete.
Once primer is applied, smaller scratches or pinholes may become more apparent. Agree on who handles that review, any correction and spot priming. If a separate painter is involved, specify the handoff so each trade understands what it receives and what it is responsible for next.
The garage repair before painting guide explains this sequence. It is especially useful when the homeowner plans to paint after the repair crew leaves. A clear final review avoids confusing a finishing defect with a paint mismatch or new damage caused by later work.
Local touch-up or full ceiling painting?
The repaired seam, the blended compound and the final painted area may have different boundaries. Aged ceiling paint can differ from a new touch-up in colour, sheen or texture. If a consistent appearance is important, discuss coating the full plane rather than assuming paint over the repaired strip will disappear.
Where the ceiling changes height or meets a boxed area, identify which planes belong in the painting scope. The garage door side, wall corners and short returns are easy to overlook in a broad description. A marked sketch can keep these details clear without requiring a complicated drawing.
If you choose repair only, record the surface condition at handoff and what remains for decoration. If primer and paint are included, confirm the products and final inspection conditions. The goal is a shared expectation about the completed garage rather than an undefined promise of an invisible repair under every possible light.
What to include in a ceiling estimate request
Provide your city, ceiling height, wide overhead views and numbered close-ups of the failed tape. Show door tracks, fixtures and stored equipment. Mention moisture history, previous repairs and whether the board appears changed or loose. Do not disturb the material to make those observations more definite.
Ask for a quote that identifies access, necessary preparation, any board work, re-taping, finishing and the chosen primer or painting stage. The total should also account for protection, cleanup and expected return visits. A floor-area rate for new drywall does not describe the same work as an overhead repair around existing equipment.
Use the quote form to share the project details and a photo link where available. EPF can then confirm the appropriate assessment and discuss a ceiling repair scope that reaches the agreed finish while accounting for the condition and access that make garage overhead work different.
Planning this repair in Burlington
Send the Burlington address or nearest intersection along with views of shelving, the garage door track and the affected joints. If the garage must remain partly in use, describe that before the quote so protection, access and possible work stages can be discussed.
EPF serves all Burlington neighbourhoods. Review Burlington garage repair coverage and neighbourhoods, then include your location with the repair details when requesting an estimate.
FAQ
Should I pull down a hanging ceiling tape strip?
Leave uncertain overhead material for assessment and photograph it from a safe position. Pulling can disturb a larger area.
Can drywall work proceed around garage door tracks?
Access needs review. If hardware changes are necessary, the appropriate door specialist should coordinate them before finishing.
Does ceiling tape repair include the wall corner?
Only if it is in the scope. Identify flat seams, corners, returns and the painting boundary separately.
Is sagging ceiling board a taping-only repair?
Do not assume so. Keep clear of suspect material and arrange suitable assessment before routine finishing.
Field Photos
What the Work Can Look Like
Article Review
AuthorEPF Pro Services
Reviewed byEPF Pro Services
UpdatedSeptember 11, 2026
Plan your drywall scope
Get a drywall quote today
Share photos, room sizes, and timing. We reply the same day with GTA drywall availability and a clearer written scope.
Quick next step